This is the third and final detailed post about controlling your smart home with a magic wand. This post will cover the software (which I’m calling PyPotter) that analyzes the streamed IR video feed to determine if a wand is present, and if so tracks the pattern the wand is making to see if it matches any of the pre-defined patterns. If the wand pattern does match a pre-defined pattern the software will make a call to your smart home controller to perform the desired action. With the right configuration you can make it do almost anything. I’ve personally turned on and off lights, changed the color of lights, played music, cooked popcorn, revealed a hidden message, and turned on a fountain all with different wand motions.
If you missed them, it would be worthwhile to be aware of part 1 and part 2 of this series before continuing.
Home Assistant
In order to be able to work with different smart devices and be as flexible as possible, PyPotter is designed to work with the smart home software Home Assistant. Home Assistant is a fantastic open source software package for home automation. It is how I use and manage my house’s smart devices. PyPotter uses Home Assistant’s REST API to give your wand the ability to control any device configured to work with your Home Assistant. A full Home Assistant tutorial is outside the scope of this post. If you don’t use Home Assistant and don’t want to, you can always modify the source code to control your devices in a different way.
How Does It Work?
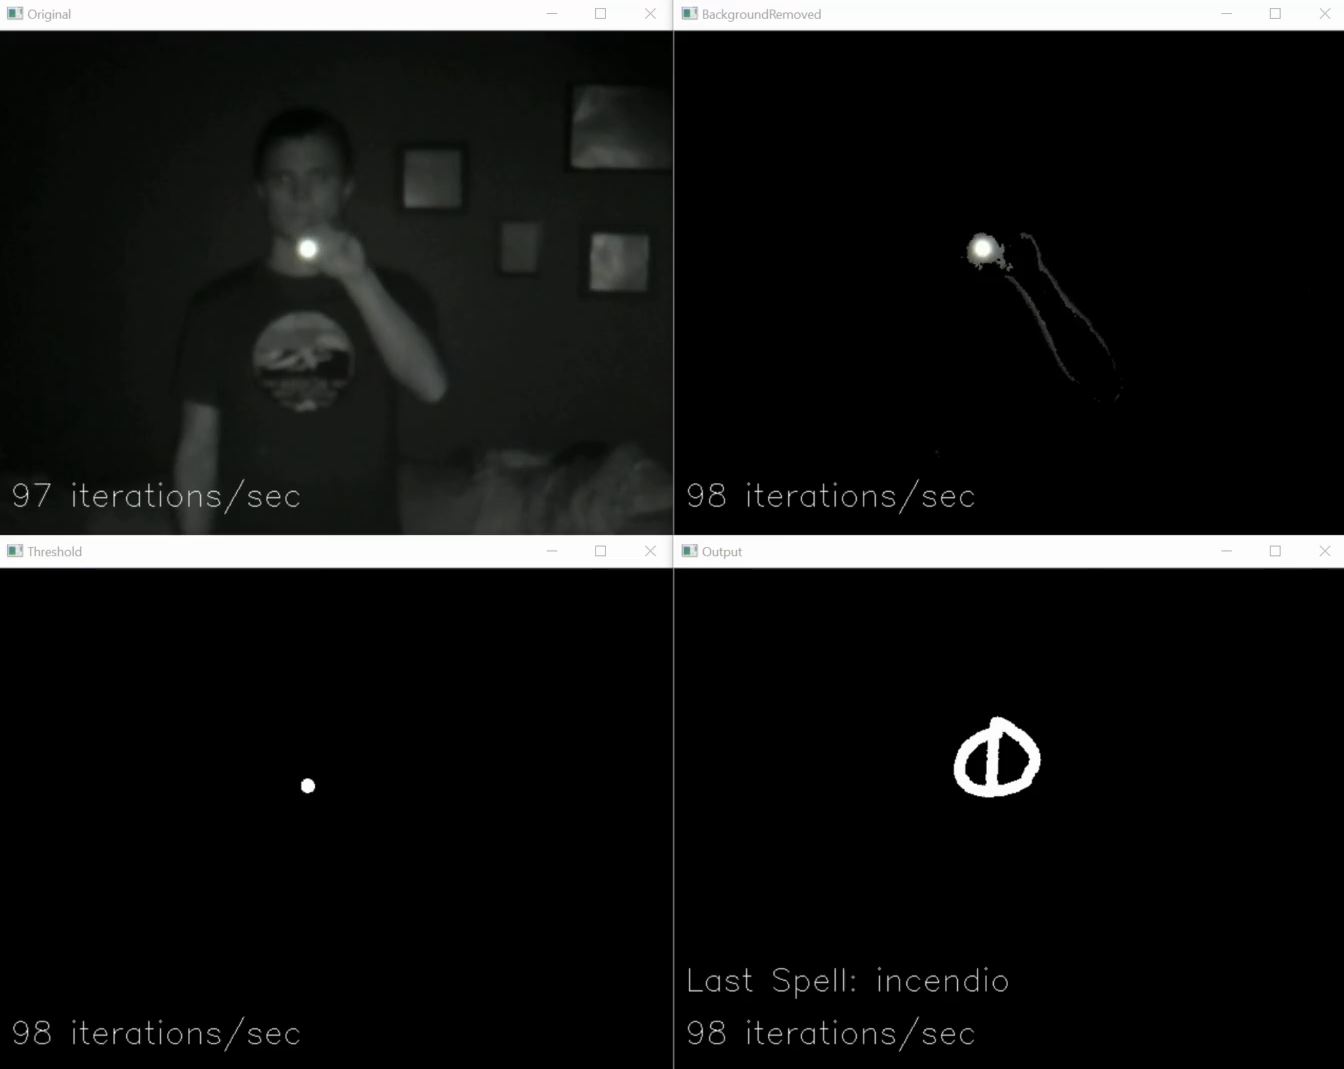
PyPotter processes data input from the WiFi Streaming IR Camera we made in part 2. An example input frame is shown below.

Each frame of video has its background removed using Open CV’s MOG2 background subtractor. This removes portions of the image that are not moving to make it easier to pick out the wand tip. This will help if there is something particularly reflective in your background that could be confused for a wand tip.

After the background is removed, each pixel of the frame is checked to see if it is above a given brightness threshold. A new frame containing only pixels over the brightness threshold is created.

This frame, with its background removed and containing only pixels over the brightness threshold, is now ready for analysis. If no wands tip has been identified, the frame is fed through Open CV’s “goodFeaturesToTrack” function to find the most prominent corners in the image, which should be the tip of our wand (if present in the frame).
Once a wand has been found, the following frames are sent through Open CV’s “calcOpticalFlowPyrLk” to calculate the optical flow of the wand tip. If all goes well the wand’s current position is calculated based on its previous position , previous frame, and the current frame. PyPotter keeps track of the x and y coordinates of the wand tip as it moves throughout the frames and stores them in a list. Using these points it calculates the total distance traveled and the distance traveled recently. A frame containing the full path of the wand is created.
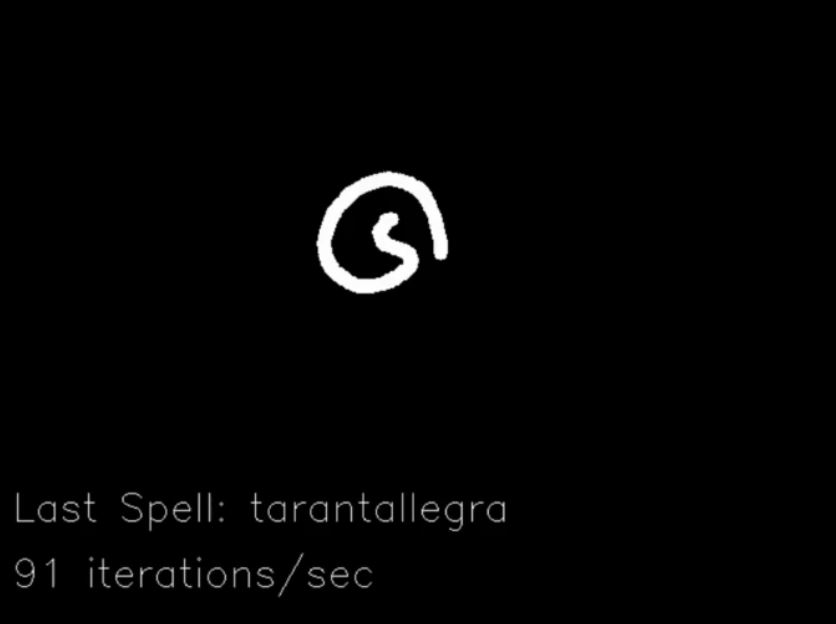
Once the distance traveled recently drops below a set value (showing that the wand has stopped moving) the full wand path frame is checked against a pre-defined set of symbols using Open CV’s k-Nearest Neighbor algorithm. This algorithm will return the name of the set of data that corresponds most with the given input. PyPotter is trained for several different spell patterns, as well as a special training set (called “mistakes”) meant to catch patterns picked up that do not correspond to spells. This bucket is required for our usage as k-Nearest Neighbor always returns the closest match, so you need at least one bucket with data that you don’t want to help prevent false positive results.
When the name of the spell is determined via the kNN algorithm, PyPotter will make a call to Home Assistant’s Rest API based on the spell to perform. The code has built in support for many of Home Assistant’s services including automation, light, media_player, and switch.
Available Spells
 | Aguamenti |
 | Alohomora |
 | Incendio |
 | Locomotor |
 | Reparo |
 | Revelio |
 | Silencio |
 | Specialis Revelio |
 | Tarantallegra |
Usage
PyPotter has three required arguments:
- Video Source URL – This is the mjpeg streaming URL of our WiFi Streaming IR Camera. Example: http://192.168.1.107:8080/?action=stream
- Home Assistant URL – This is the URL of the Home Assistant that we will use to control our smart devices. Example: http://192.168.1.100:8123 or https://mydomain.duckdns.org:8123
- API Token: Your Home Assistant REST API token. Follow instructions here to get create and get a token for your profile.
PyPotter has three optional arguments:
- Remove Background – Defaults to True. Defines whether PyPotter should remove the background from frames. Not removing the background can save significant CPU usage. Must be 4th argument.
- Show Output Windows – Defaults to True. Defines whether PyPotter shows the output video windows. Must be 5th argument.
- Training – Default to False. If set to “True” PyPotter will save the image of every computed full track so you can add it to the training folder for new or improved spell matching. Must be 6th argument.
PyPotter is not meant to actually be ran on a Raspberry Pi (the “Py” in its name is for Python). PyPotter can (and has) run on a Pi, but you will get better performance running it on a standard PC. I originally developed it on a Windows PC and I currently run it on an Ubuntu server. By using a PC instead of a Pi we get access to higher frame rates, better background removal algorithms, higher resolution pattern recognition, and faster throughput. The downside is that it is not running on its own stand-alone device, so if you don’t have a system that is always on it can be a bit of a pain to make sure it is running. If you do end up using it on a Pi, I highly recommend turning off the Remove Background feature.
Acknowledgements
PyPotter owes some of its code and inspiration to two projects doing similar things. The first of those is Sean O’Brien’s Raspberry Potter project. In this project Sean uses a similar method (IR Lights / IR Camera / wand) to control “Ollivander’s Lamp”. The second project is mamacker’s “pi_to_potter” which builds on Sean’s work. In pi_to_potter mamacker significantly improves the original Raspberry Potter software by using pattern recognition for detecting wand patterns. PyPotter builds on both of these projects, adding its own improvements and integrating with Home Assistant to allow for controlling almost any smart device.
Where is the code?
The code is available on GitHub here.
Great work Adam. I am working on a Raspberry Pi 3 Model B with
a version of mamaker’s trainedwpins.py script, and I am wanting to add in a bit of background subtraction to take away pesky background lights or reflections and a starting point; so the tracking will not start until the wand tip stays still under a threshhold of distance over a threshold of time. Any pointers would be appreciated.
Hi David, thank you for the kind words. The source code provided on my GitHub should take care of both of those issues for you. It has background subtraction by default.
The tracking in my code resets after a period of minimal wand movement. This allows you to bring the wand up to the camera, pause it for a moment to reset the tracking, make your shape, then pause again for a moment to end that track.
If you need the functionality above combined with makmacker’s usage of pins, you should be able to replace the Spell function in my code with his.
Let me know if you have any trouble.
Hi Adam,
I am using a Picamera with a Raspberry Pi.
I am importing picamera and imutils
and from imutils.video.pivideostream import PiVideoStream
and then videosource = PiVideoStream().start()
In your code, what are the changes necessary to use the picamera straight off the Raspberry Pi?
Hi Adam,
Just checking in again. I saw the article that you wrote there’s a version of this that you make for the raspberry Pi. Could you leave a software link for it.
Thank you,
David
Hi David,
The code published in the GitHub can be ran on a Pi in its current form. You don’t need to use PiVideoStream, you can use mjpgstreamer as described in the camera blog post. In my testing I had mjpgstreamer and PyPotter running on the same Pi. Running them both on the same Pi works. The framerate was lower than I preferred, which is why I run PyPotter on a more powerful machine. I hope that helps!
Hi Adam. Thanks so much for sharing your project. I had a blast putting it together.
My one issue is with PyPotter.py hanging after it loads all the spells. I don’t know enough about Python and cv2 to know why that’s happening. The main thread works fine if I comment out the CalculateThreshold and ProcessData threads–I see the “Original” window show up and the “iterations per second” annotation is updated in realtime. I can also press Esc to exit.
With all threads running, however, the four windows show up, but I then get a spinning wheel when I try to move the windows, and have to force quit Python to exit.
I’m running Python 2.7.15 on macOS Mojave. I’ll carry on trying to debug it.
Hi Alan,
Glad to hear you’ve enjoyed putting the project together! Have you had any luck with the PyPotter.py? I used Python 3.7 and OpenCV 4.0.0.21. Can you try those versions and see if that helps?
Hi Adam,
As Alan mentioned above, thanks for sharing this cool project!
I’m having a similar issue as Alan. I’m on an i5 laptop running Ubuntu 18.04. There were no problems getting the camera to work (enjoyed assembling that btw). When running the script, four windows popup but no pictures. Esc stops the process and the windows disappear. The error I’m getting that repeats over is:
Trained Spells:
{0: ‘specialis_revelio’, 1: ‘alohomora’, 2: ‘reparo’, 3: ‘locomotor’, 4: ‘silencio’, 5: ‘mistakes’, 6: ‘tarantallegra’, 7: ‘incendio’, 8: ‘revelio’, 9: ‘aguamenti’}
[tcp @ 0x19ef580] Connection to tcp://192.168.129.233:8080 failed: Connection timed out
[ERROR:0] global /io/opencv/modules/videoio/src/cap.cpp (116) open VIDEOIO(CV_IMAGES): raised OpenCV exception:
OpenCV(4.1.1) /io/opencv/modules/videoio/src/cap_images.cpp:253: error: (-5:Bad argument) CAP_IMAGES: can’t find starting number (in the name of file): http://192.168.129.233:8080/?action=stream in function ‘icvExtractPattern’
I get this running either on python 2.7 or 3.6.8
Did some research but couldn’t find an answer, at least for a novice like me. Any ideas?
Hi Bob,
Thanks for the compliments! I used Python 3.7 and OpenCV 4.0.0.21. Can you try those versions and see if that helps?
Hi Adam. Everything works! (Thus far…)
So I found my problem mentioned above and it was a really dumb error on my part. The excitement of building this project was so great that I failed to check the IP was slightly off. Correcting the IP fixed the opencv problem. Was giddy when wand tracking worked perfectly!
My last hurdle is the bridge between pypotter and home assistant. I’m very new to HA and learned as much as I could, but am still a bit stumped. Without going into details, may I ask your HA API setting for ‘automation.wand_incendio’ as an example for me to pick apart? Thanks again!
Bob
Hi Bob,
That’s great! I’m glad you were able to get it working with the tracking!
HA definitely has a bit of a learning curve to it. Once you get it though, it is truly a great tool.
Here is the YAML for the incendio automation:
  - alias: wand_incendio

    trigger:

    action:

      - service: light.turn_on

        data:

          entity_id: light.living_room

          color_name: white

      - service: light.turn_on

        data:

          entity_id: light.living_room

          color_name: red

      - service: timer.start

        data:

          entity_id: timer.reset_lights
This automation turns my living rooms white, then kicks off a timer (that I’ve set up separately) to reset the lights after a period of time.
Let me know if you need anything else!
Thank you! It was very helpful and was able to get everything working! I found I was on the right track on HA and with your example, nailed it. Thank you for this great project!
Bob
That’s awesome Bob, I’m glad you were able to get it working! Thanks for sharing your success story. 🙂
Adam – I have the noir ir camera’s working and PyPotter running on a decent laptom (i7 Dell Precision) but the video stream seems to freeze at the moment PyPotter starts. I can’t figure it out… Could it be I should use QT rather then GTK support in openCV?
OpenCV build info here:
I am using Python 3.6
I modified PyPotter to not use haas and am just printing when spells are correct.
Modified PyPotter here:
Here is a screen recording of the freeze behavior.
https://youtu.be/6hE-gLUdFpY
Here is a recording of camera testing. Streamed to a browser.
https://youtu.be/fqjHoIxIbAU
Hi Jeffrey, how did you get around the Original window freezing? I saw mention of QT versus GTK, was that it?
I am able to get it to not freeze and actually update the original window with the live webcam feed by commenting out the IsNewFrame = True inthe main while loop. Any tips would be greatly appreciated, thanks.
Python 3.7.13
opencv-python 4.0.0.21
Left some messages the other day – it’s working for me now – I am convinced it is the GUI support that is used at build time.
(WITH_GTK=ON)
Here I am testing with a red LED.
https://www.youtube.com/watch?v=DMfJG0TPoPk
I am going to create new training images with my particular setup and then put the system into my robotic Santa.
https://drive.google.com/drive/folders/0B7Fz8JPNKxs0MnlyMnlBTXNxaDg?usp=sharing
https://www.facebook.com/HackedSanta-223492104761772/
Jeffrey – Sorry for not responding to your messages earlier. They were flagged for some reason, so I didn’t see them originally. I’m glad that you were able to get it working! Your Santa looks like a fun project, I hope you were successful!
Thanks for sharing your videos and other helpful links! I’m sure those will be helpful for other users.
Hey Adam,
Thanks so much for sharing this project. I plan to use it for my kids birthday too, she is gonna love it. I have been working for the last few days and I have everything up an running but I keep getting an error in the python code while it is running.
Traceback (most recent call last):
File “/usr/lib/python3.6/threading.py”, line 916, in _bootstrap_inner
self.run()
File “/usr/lib/python3.6/threading.py”, line 864, in run
self._target(*self._args, **self._kwargs)
File “PyPotter.py”, line 369, in ProcessData
wandTracks = CheckForPattern(wandTracks,localFrameThresh)
File “PyPotter.py”, line 245, in CheckForPattern
contours, hierarchy = cv2.findContours(wand_path_frame,cv2.RETR_EXTERNAL,cv2.CHAIN_APPROX_SIMPLE)
ValueError: too many values to unpack (expected 2)
This seems to be stopping the output window from picking up the wand movement and therefor will not allow the user to see if they are completing the movement. Any help you could offer would be greatly appreciated. Thanks again for all your hard work setting this up.
Grant
Hello,
Thank you very much for this tutorial, it is very good.
I use Python 3.7 and OpenCV 4.0.0.21. When I start the script, the 4 windows appear. But the problem is that nothing moves, in the window there is only a picture taken when starting the script. Do you have an idea what can cause this?
Thank you
Bob – Are you seeing any errors in the output window? I’m afraid that behavior alone isn’t enough for me to diagnose.
No error message 🙁
Hi Adam I was wondering what file or files I have to modify to put all the required arguments in?
Autiboy – I don’t understand your question. You shouldn’t have to modify any files, the required arguments are used when you call PyPotter from the command line.
I'm having the same problem that Bob is having. When I start the script, 4 windows open. The one marked "original†shows a static image captured from the camera and the other 3 windows show a small black rectangle.
Jeff – Sorry to hear that. Please see the reply to Bob’s question.
I am trying to surprise my two middle boys (6/9) for their birthday with a “magic” picture frame. I am not using home assistant (removed arguments and references), just a Pi Zero and an old laptop screen to mount inside a frame. I’ve got everything up and running and am trying to get your script to run successfully. To begin I’m just printing text on the screen when the spell is cast. I will add pictures, video, or audio to the If clauses. I am getting the following two errors:
** (Original:1359): WARNING **: Error retrieving accessibility bus address: org.freedesktop.DBus.Error.ServiceUnknown: The name org.a11y.Bus was not provided by any .service files
and
(2)
Traceback (most recent call last):
File “MyPotter.py”, line 425, in
videoCapture = cv2.VideoCapture(videoSource)
NameError: name ‘videoSource’ is not defined
I would be greatful for any help as I am trying to save birthdays that will otherwise suck while “Sheltering in Place”
Thanks!
James
Hi James,
That sounds like a fun thing to do while sheltering in place. I hope you are successful!
Your error code makes it sound like it wasn’t able to open the video source. It is expecting the URL for a webcam to capture video from. I did not use the built in Pi camera directly, I used an MJPG streamer to get the video from the Pi camera. You can find details on that in “Part 2” of this series.
Let me know how it goes or if you have any other questions!
Turns out I had tried to comment out the Hass/Home Assistant stuff and got rid of all the arguments – realized I still needed the video argument. I got past the error above but I have an “incorrect arguments” issue. I commented out and changed the arguments (new to Python, tried to reduce all argument numbers by 2 as I still need the video argument right?). I love this code and feel like I’m so close! Any help on how to modify to not use Home Assistant while keeping the video argument? Thanks!
If I’m doing it all in one Pi Zero would it be better to use the camera itself rather than stream?
Unfortunately I don’t think you are going to be able to get this to run on a Pi Zero using either method. The image recognition portion (opencv functions) barely ran on a Pi 3B+ at a high enough frame rate to be acceptable when I was I working on this project. I typically ran it on my desktop computer in order to achieve the best FPS of the image recognition.
Darn, thought I could pull it off – guess it is back to the original rpotter with simple gestures…thanks Adam
Hi James, glad you are making progress! If you are getting an error message, the best thing to do is to search through the code for exactly that message and you will find the area that is causing it. In this case it sounds like there is a minimum argument check that just needs updated to pass.
I need the argument for the videoSource right? Because it is used later. But the if statements after that are also needed so I tried to subtract 2 from them all since I commented out the Hass and API….not sure how to pass the argument….
Hi Adam.
First off – thank you! I am super excited to get this set up for my son’s birthday next week.
I believe I have everything setup correctly (however I am new to this). I am using Terminal on my Mac to ssh my raspberry pi that will run the program.
When I attempt to run the script using:
python3 PyPotter.py
This is what I receive:
Incorrect number of arguments. Required Arguments: [video source url] [home assistant URL] [API token]
I am not sure what to do next or how to solve this… I know each of these (including the API Token) however I am unclear as to how or where I put them.
Please forgive my beginner level questions… Any suggestions appreciated.
Thanks again.
Hello again.
Looks like I was able (maybe) to figure out how to pass the arguments… now I get this in return:
Unable to init server: Could not connect: Connection refused
(Original:5272): Gtk-WARNING **: 14:33:38.283: cannot open display:
Hi Jordan,
Glad you were able to figure out the issue with passing the arguments. Unfortunately I have not seen the error you mentioned so I can’t help there. Good luck!
Here’s the syntax you should be using to run the script… You run this from the directory where the python script is located…or you have to spell out the entire path to the python script instead of just what you see below. See below:
.\PyPotter.py “http://172.16.12.15:8080/?action=stream” “http://172.16.12.12:8123” “characters_of_your_api_token_from_home_assistant”
Adam,
Thanks for posting this project. It’s certainly been fun working my way through it. At this point I’m just trying get it to power a smart power outlet (to turn on the xmas tree or halloween lights) and maybe my sonos speakers so the kids can have a bit of “magic” with their Harry Potter wands.
I’ve got most of the bits and pieces functioning at this point. I jacked the framerate up to 80 which seems to capture the wand nicely…but crushes my laptop with all the data(I think) and slows down the processing of images. I just need to tune it a bit or move to a standalone machine I think.
My real issue is with Home Assistant and trying to get the wand recognitions to trigger actions on the Home Assistant device and call to a smart device.
Do I need to edit the “automations.yaml” in Home Assistant or “configuration.yaml”? I think…to play audio on sonos using the “silencio” spell…I add this to a yaml:
media_player.living_room_2
media_player.media_play
Still not quite sure how the “silencio” api call triggers the function though. Some of this still seems like magic to me.
Thanks for any help you can provide.
Corey
Hi Corey,
I’m happy to hear you have been enjoying the project and have it mostly working!
I also had the best results at the higher FPS, particularly when using it with younger wizards. I had a lot of issues with all of the data (frames) saturating the WiFi, so I had much better luck using an Ethernet connection from the camera (pi with camera) to the PyPotter (desktop) host. Not sure if that will help you or not, but wanted to mention it.
On Home Assistant, I added an example YAML to the repo you can look at for some examples: https://github.com/adamthole/PyPotter/blob/master/Home%20Assistant/smart_wands.yaml
I add this into my configuration.yaml using the “packages” feature (https://www.home-assistant.io/docs/configuration/packages/). In HA there are many ways to do the same thing, so you could add similar code to your configuration.yaml or automations.yaml and also get it working that way. I just prefer the packages option.
Hopefully that information helps! Let me know if you are still having trouble.
Adam…Thanks for the reply!
So it looks like I’m getting api calls to happen between the laptop and the home assistant server. I had run wireshark and did not see any traffic initially, but I was able to see the calls in the logs in home assistant. They were “unable to find referenced entities automation.wand_”.
I first added “part” of your yaml syntax to the configurations.yaml after commenting out the != line for automations.yaml…and added the below lines. No luck..logs are now generating “wand_incendio: Error executing script. Service not found for call_service at pos 1: Unable to find service light/turn_on”.
I also tried adding the syntax to the automations.yaml instead…with the same results. I may have to school myself a bit more on how home assistant works. But in case you see a glaring error…I’ve included what I put in first in the configurations.yaml, then the automations.yaml. I’d definitely be interested in your suggestions. I’m only trying to turn on two smart outlets (plug_one, plug_two)Thanks again for the help.
automation: #(USED THIS LINE IN THE CONFIGURATIONS.YAML…REMOVED IN THE AUTOMATIONS.YAML
– alias: wand_incendio
trigger:
action:
– service: light.turn_on
data:
entity_id: switch.plug_one
#color_name: white
– service: light.turn_on
data:
entity_id: switch.plug_two
#color_name: red
Home Assistant is a fantastic product and extremely powerful, but it definitely has a learning curve to it.
It looks like you need to change your service to “switch.turn_on” since your entity_id is a switch and not a light. In my case it was a light, but in your case it is a switch. Let me know if that helps!
Adam, I gave a gaming i7 pc however unable to get above 15 FPS in image recognition – the picture just interrupts while i’m moving a wand. Any suggestions in tweaking the code please?
It’s difficult to give much advice without more details, but given your powerful PC, the bottleneck is likely between the Pi Zero and your computer. I know I had issues with WiFi on my setup (the mjpg streamer uses quite a bit of bandwidth) so I eventually switched to Ethernet on a Pi B with significantly better results.
Hi Adam, my two youngest brothers got very excited after seeing this project so we decided to try it out ourselves to put in their room. Since it’ll be in their room, I was really hoping to avoid streaming the video on the network. I know you brought up that the raspberry pi 3 would struggle to run this alone so I wanted to ask if the rp4 would be strong enough or if it would struggle as well. And if not the rp4, do you recommend a different sbc to do this job? This would also avoid the bandwidth problem you brought up in the last comment.
Hi Ghassan, that is awesome on your brothers! When the Pi 4 came out I did try it out and it only improved things slightly. This was fairly early in the Pi 4 days, it is possible opencv has added some optimizations that make use of the Pi4’s GPU since then. I haven’t tried any other SBC’s. If you end up trying a Pi 4 or anything else let me know. Good luck!
Sorry if this is a stupid question, but would openCV work with a USB IR camera instead of wifi camera? If yes, what changes in the code would be needed?
OpenCV does work with USB cameras. I would check the OpenCV documentation for how to work with a USB camera.
Adam,
This has been a lot of fun, and it’s forcing me to learn some new skills, but can you point me in a direction for an error i’m getting? When I launch PyPotter, i’m now getting 41 iterations per second, but i’m throwing errors in the python window. THis is what shows up after I launch:
C:\Users\Jon.MARS\Documents\GitHub\PyPotter\PyPotter.py:453: SyntaxWarning: “is” with a literal. Did you mean “==”?
if (cv2.waitKey(1) is 27):
Trained Spells:
{0: ‘aguamenti’, 1: ‘alohomora’, 2: ‘incendio’, 3: ‘locomotor’, 4: ‘mistakes’, 5: ‘reparo’, 6: ‘revelio’, 7: ‘silencio’, 8: ‘specialis_revelio’, 9: ‘tarantallegra’}
Exception in thread Thread-3:
Traceback (most recent call last):
File “C:\Program Files\Python39\lib\threading.py”, line 954, in _bootstrap_inner
self.run()
File “C:\Program Files\Python39\lib\threading.py”, line 892, in run
self._target(*self._args, **self._kwargs)
File “C:\Users\Jon.MARS\Documents\GitHub\PyPotter\PyPotter.py”, line 367, in ProcessData
wandTracks = CheckForPattern(wandTracks, localFrameThresh)
File “C:\Users\Jon.MARS\Documents\GitHub\PyPotter\PyPotter.py”, line 238, in CheckForPattern
cv2.line(wand_path_frame, (x1, y1),(x2, y2), (255,255,255), thickness)
cv2.error: OpenCV(4.5.2) :-1: error: (-5:Bad argument) in function ‘line’
> Overload resolution failed:
> – Can’t parse ‘pt1’. Sequence item with index 0 has a wrong type
> – Can’t parse ‘pt1’. Sequence item with index 0 has a wrong type
Hey Jonathan,
Glad you have been having fun and learning! Unfortunately I haven’t seen that error and I am not sure what it means. Sorry! I used Python 3.7 and OpenCV 4.0.0.21. It’s possible some calls have changed since I wrote the code.
Adam,
I uninstalled the newer versions and went with your versions and its working! I am having a ‘iterations/sec’ that starts dropping/lagging and after a period of time recovers however . Is that caused at the PiZero/Camera side or the Python PyPotter side? I’m running the PIZero at the default settings that you had outlined.
Hey Jonathan,
Glad that worked!
I think the issue you described is on the side of the PiZero, in particular the WiFi. I had much more consistent results using a Pi 3B with Ethernet. If I recall correctly, I had the same issues on the 3B with WiFi, but all worked very well over Ethernet (going to my wired desktop running PyPotter).
I seem to be having trouble also. I downgraded python to 3.7 like you have, and also installed the same version of opencv, to match.
When I start PyPotter, I get the camera frame, and it basically doesn’t refresh, and Ubuntu ends up asking me to “force quit” the process as it is stuck spinning on it.
I know my connection to HASS is good because I modified the PyPotter script to call hass2.turn_on to a switch in the home, and it does that step before initializing the 4 windows. Only the original window has anything in it, which is a snapshot of the camera, and the other 3 are black panes. The original window never refreshes though, so I am not sure what the issue is?
I know i’m close. I’ve now rebuilt the system using a Pi4 for the camera, and actually running the Homeassistant on the same Pi4 (4GB), and that ‘appears’ to be working okay. I’m not having any luck activating however. I see in the Python window ‘match: aguamenti’, but it’s not doing anything in HomeAssistant that I can see. My config.yaml file is:
# Configure a default setup of Home Assistant (frontend, api, etc)
default_config:
# Text to speech
tts:
– platform: google_translate
group: !include groups.yaml
automation: !include automations.yaml
script: !include scripts.yaml
scene: !include scenes.yaml
packages:
pack_1: !include smart_wands.yaml
and my smart_wands.yaml
automation:
– alias: wand_aguamenti
trigger:
action:
– service: switch.turn_on
data:
entity_id: switch.outlet_1
I copied the entity_id from the SmartAssistant interface, so that should be right. Lots of learning, but any pointers to what I may be doing wrong?
Hi @Jonathan, I’m curious which OS you are using on your Rpi4? Also which versions of Python & OpenCV? Did you get it working with Bullseye or an older OS? Mind posting any tweaks you had to do to get things working that may not be documented here?
Hey Adam!
trying to understand why im getting this error. any help?
>>> %Run rpotter.py
Traceback (most recent call last):
File “/home/pi/Downloads/rpotter-master/rpotter.py”, line 54, in
Scan()
NameError: name ‘Scan’ is not defined
Amazing concept! Has anyone gotten this working recently, or have an image file they’d be willing to share? I installed an older OS image of Buster (Python 3.7.3) and tried installing packages without apt updates to avoid incompatibility issues with newer packages. I wasn’t able to find Opencv 4.0.0.21 but did find and install 4.0.1.24. Not having much luck, unfortunately.
First off, awesome project and thank you so much for the guidance!! I haven’t computer science’d anything since 2005 and have been learning Python and Home Assistant just for this. I have been fighting the software for over a week on Mac and Windows before I uninstalled everything and then loaded Python 3.7 and OpenCV 4.0.0.21. Boom, everything started working. Just need to integrate with Home Assistant now.
Thank you, Adam for posting this! Followed the I built a different camera/IR light system and used GPIO pins to drive a 110V relay off the Home Assistant Pi to switch on different fans/lights/waterfall features around the house. Totally cool surprise for all the kids at my son’s birthday party. Had a blast getting it working and coming up with my own twists. Thank you!! For anyone else doing the same, you MUST use the versions of CV2 and Python noted in the comments above or you’ll end up with all sorts of non-working conditions. Trust me, I’ve seen them all in the past week as I got this going myself. But once I got the VM set up with the proper versions, it worked like a chram.
That is great to hear Jason! Glad you got it working, and glad it was a hit at your son’s birthday party. 🙂
Hey Adam,
Fantastic project and I am really excited to get everything working! I have got the wand tracking in a windows VM. But seem to be stuck on getting the communication between my pi and home assistant.
My error is currently this:
Exception in thread Thread-3:
Traceback (most recent call last):
File “C:\Users\pypotter\AppData\Local\Programs\Python\Python37\lib\site-packages\requests\models.py”, line 379, in prepare_url
scheme, auth, host, port, path, query, fragment = parse_url(url)
File “C:\Users\pypotter\AppData\Local\Programs\Python\Python37\lib\site-packages\urllib3\util\url.py”, line 207, in parse_url
raise LocationParseError(url)
urllib3.exceptions.LocationParseError: Failed to parse: (my ip address),
Is my requests module or urllib3 possibly too new?
I hope all is well thanks.
I recently discovered this contribution of yours. I have finally gotten it running (after some difficulties with mjpeg sources). Can you provide feedback for my issue of the Output window not displaying anything at all other than black? The size of the visible window is also smaller than the source windows, with regard to video resolution. My troubleshooting so far hasn’t revealed any obvious cause. No IR reflections toward the camera ever show up in the Output window. Is this just a simple matter of the brightness threshold? I found your threshold variable and some changes so far only cause the third window to become more noisy. Thanks in advance for any feedback you would like to provide.
Hi Adam, Great Project! I know I’m a bit late in the game, but only thought of implementing such a project after my daughter read all the Harry Potter books.
I have the full adam project working with Home Assistant included. At first, I tried running the camera off of the PI zero W. As you previously indicated performance was not good. Rather than try another PI3B, I decide to use the webcam (usb or onboard) on the windows computer by changing the capture source to “0” and using a light up/led type of wand instead. Testing results are good so far.
Change of PyPotter.py code:
# Set OpenCV video capture source
videoCapture = cv2.VideoCapture(0)
With this setup. most of the spells work. For some reason, I cannot get Revelio to work and maybe 1 or 2 other spells to be recognized/match with the training images. I thinking of adding with my own revelio “R” png files to the Revelio training folder, in hopes that the success rate would improve. Any suggestions on how to troubleshoot these last couple of spells?
Thanks!
That is great to hear! I’m glad it is all working for you. That is interesting you were able to get it to work with a webcam. I would have expected the IR filter that is on most webcams to block most of the IR light. I’m glad it worked for you. Having it on the same computer that is running the Python is ideal, nice setup!
On the spells that aren’t working I would definitely add your own png files to the training folder. When I initially set it up my kids weren’t able to get some of the spells (that were all based on my wand-writing), so I added some training png files made by their movements and that fixed the issue. It sounds like we must make our R’s differently. 🙂 I hope that helps!
this is an awesome project! thanks for making it.
i have had a few issues getting this running.
1) i could not find 4.0.0.21 of python opencv so i used 4.3.0.38
“ERROR: No matching distribution found for opencv-python==4.0.0.21”
the output shows 4 grey boxes and then nothing, not sure how to debug. i tried just having opencv load the stream and it shows the cam, any recommendation as to how to debug this?
thanks
Raptor
ok so i fixed the 4 gray boxes issue. the problem was i had conflicting versions of python. once i uninstalled everything and installed python 3.7 i was able to install opencv 4.0.0.21 i was able to get it to show all the video.
now i have a new issue, the output is showing the want track, but it never seems to find the match.